2D is fast for plans; 3D sells the vision and wins clients.
Picture this. You have a yard to transform and a client who cannot read a plan. Or you are a homeowner who needs a clear path from idea to install. 2D drawings make layout easy and fast. 3D scenes make ideas feel real and persuasive. The right choice depends on goals, time, and budget. In this deep guide, I break down 2d vs 3d landscape software in plain words. I show where each shines and where it struggles. I’ll also review a budget-friendly option you can buy today. By the end, you’ll know what to pick, how to use it, and how to get great results.
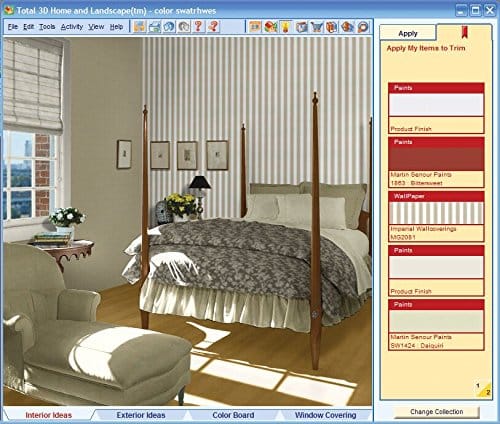
Total 3D Home, Landscape & Deck Suite 12

This suite blends home, landscape, and deck design in one package. It is simple to learn and easy to use. If you want to sketch a yard, set a deck, and test plants, it can help. It gives you 2D plans and a basic 3D view so you can show ideas fast.
You can drag and drop patios, walks, and plants in minutes. The deck tools speed up framing and layout. The plant items help you plan borders and shade. You also get material lists that can guide a trip to the store.
Pros:
- Beginner-friendly interface that reduces the learning curve
- Both 2D plan view and basic 3D visualization in one app
- Deck tools and objects that speed up layout and framing
- Plant and material libraries to build out scenes fast
- Cost-conscious option for DIY users and first-time designers
- Good for quick mockups and early concept reviews
- All-in-one workflow for home, yard, and deck tweaks
Cons:
- Rendering realism is basic compared to pro-grade 3D tools
- Limited CAD and BIM features for advanced documentation
- Fewer file exchange options for complex team workflows
My Recommendation
If you are new to design or do small jobs, this tool fits well. It lets you switch between a 2D plan and a simple 3D view fast. That helps when you weigh 2d vs 3d landscape software for a tight budget. It will not match pro tools for realism or data. But it gets your ideas on screen and keeps costs in check.
I like it for quick plan updates and deck layouts. It helps me show a homeowner how a patio meets a lawn or how a deck steps down to grade. If you need fine detail, you can export basic views and polish them elsewhere. For fast turnarounds, it keeps things simple and clear.
| Best for | Why |
|---|---|
| DIY homeowners | Easy tools, quick 2D and 3D, low price |
| Handymen and small contractors | Fast deck and patio plans for bids and estimates |
| New designers | Simple way to learn 2d vs 3d landscape software basics |
2D vs 3D Landscape Software: What Matters Most
When I compare 2d vs 3d landscape software, I start with the goal. Do you need a clean plan to build from? Or do you need a vivid scene to sell the idea? Most projects need both at some point. The trick is to choose where to invest time and money first.
2D is about clarity. It is quick to draft, easy to edit, and simple to print. 3D is about emotion. It shows light, shadow, and scale. It helps clients “feel” the space. Each has strengths. Each has limits. Smart workflows use both.
What 2D Landscape Software Does Best
2D tools shine for plans, permits, and builds. They make symbols, linework, and dimensions clear. You can call out slopes, spot grades, and plant tags fast. This is ideal when a crew needs a clear path to install.
2D also keeps files small and stable. This helps on older laptops in the field. Edits are quick. Plans print well. If you have tight deadlines, 2D can save the day. It removes guesswork and keeps costs down.
What 3D Landscape Software Does Best
3D tools help people see the idea. Sunlight, views, and height are clear in 3D. Clients grasp scale. They see how a pergola frames a view. They see how a hedge adds privacy. They say yes faster.
3D also aids design. You can test grades, steps, and walls in context. You can check sight lines. You can study how trees cast shade at noon in summer. That level of insight is hard in 2D alone.
The Real Tradeoffs in 2d vs 3d Landscape Software
Speed versus realism is the core tradeoff. 2D is fast. 3D is real. With 2D, you draft and annotate with ease. With 3D, you model and render. That extra step adds time. But it can save time later by preventing mistakes.
Cost and skills also matter. 2D tools cost less and take less training. 3D tools vary. Some are simple. Others need a strong PC and time to learn. Plan your budget. Plan your learning path. Then match software to your plan.
How I Choose for a New Project
I ask two questions up front. First, what does approval require? If I need permits and details, 2D leads. If I need buy-in from a spouse or board, 3D helps. Second, where is the risk? If grade or privacy is tricky, 3D gives me confidence.
Often I start in 2D to block space fast. Then I switch to 3D to test views and sun. After that, I go back to 2D for final plans. This hybrid path keeps the work light but sharp.
Key Features to Compare in 2d vs 3d Landscape Software
- Plant libraries: species, sizes, and mature spread
- Hardscape tools: patios, walks, edging, and pavers
- Terrain: grading, contours, slopes, and cut-fill
- Deck design: framing, stairs, and railing options
- Lighting: fixtures, color temp, and night previews
- Irrigation: zones, heads, and pipe runs
- Sun studies: time of day and seasons
- Rendering: materials, shadows, and water effects
- Output: plans, takeoffs, and image exports
- Collab: file formats, layers, and markups
Workflow: A Simple Way to Mix 2D and 3D
Start with a base map. Use a site survey if you have it. Or measure in the field and sketch. Lay out edges, drives, and the house outline. Keep it light at first. Use 2D for this stage.
Switch to 3D for massing. Place walls, decks, and big trees. Check sun, views, and privacy. Then back to 2D to lock grades and details. This flow saves time. It keeps you from over-modeling early.
Hardware and Performance
2D runs on most laptops today. It needs little GPU power. You only need a good screen and a mouse or pen. That is great for field work. It also saves money on gear.
3D needs more power. Look for a recent CPU and a mid-range GPU. Check RAM. 16 GB is a safe floor. For large sites, more helps. Fast storage helps too. It cuts load times.
File Formats and Team Work
For 2D, DWG and DXF are common. Many tools also export PDFs. That is fine for bids and reviews. Use layers for clean handoffs. Use line weights for clear prints.
For 3D, formats vary. OBJ, FBX, and SKP are common. They let you move models between apps. If you work with an architect, ask what they use. Match your tool to their needs to avoid rework.
Cost and Value Over Time
2D apps often cost less per seat. They also need less training. That lowers the total cost. If you focus on installs and permits, this makes sense. It pays off fast.
3D can cost more. But it can raise close rates. A good 3D scene can win the job. It can increase average project value. That can pay for the software many times over. Do the math based on your sales cycle.
Use Cases: Which Path Wins?
Small yard refresh: 2D. You need a fast plan with plants and edging. The crew needs sizes and counts. A simple 3D view is a plus but not a must. Keep it lean.
New build with grade work: 3D plus 2D. You need to see slopes, walls, and steps in context. 3D helps avoid bad slopes at doors or patios. Then you finish with 2D details.
High-end outdoor room: 3D leads. For kitchens, pergolas, and fire features, 3D sells the space. Show night lighting and seating. Then document in 2D for permits and bids.
Planting Design in 2D vs 3D
In 2D, plant symbols are clean and fast. You can set sizes, tags, and counts. You can show bed edges and mulch. This makes a neat plan that crews like.
In 3D, plants show mass and scale. You can see how a hedge blocks a view. You can see how a tree shades a patio. But plant libraries vary. Check the species you need. Check the sizes and forms.
Grading and Drainage
2D grading plans are precise and compact. Spot grades and slopes tell the story. Crews can stake from the plan. It is fast to edit if the site changes.
3D helps you test how water moves. You can see swales and mounds. You can view steps and walls with a true feel. If drainage is a risk, 3D can save costly fixes.
Lighting and Night Views
2D lighting plans show circuits and fixtures. They are good for bids and wires. The symbols make it clear where to dig and mount.
3D night scenes sell the mood. You can place path lights, uplights, and wash lights. You can adjust color and beam spread. Clients love to see evening views before they buy.
Decks, Patios, and Hardscape
For decks, 2D plans help with framing and code checks. You can mark joist spans, footings, and stairs. That matters to inspectors and builders.
For patios and walls, 3D shows steps, seat walls, and coping. It shows how people move and sit. This helps you pick the right heights and widths. It also helps with material choice.
Learning Curve: How Long Until You Get Good?
2D tools are quick to pick up. You can draw lines and arcs on day one. You can place symbols and dims in hours. With a few projects, you get fast.
3D varies by app. Simple tools can be learned in a weekend. Pro tools take longer. Rendering also takes time to learn. Plan for practice. Use small jobs to grow skill.
Team Adoption and Training
If you run a crew, choose tools that new hires can learn fast. 2D meets this need. It reduces training time and stress. It keeps the team focused on installs.
For sales roles, invest in 3D. Give them templates and ready scenes. They can tweak and present on the fly. This boosts close rates. It also builds your brand.
Output: What Do You Hand to Clients and Crews?
Clients need to see the idea and the cost. A few 3D views do wonders. A simple plan helps them track changes. A clean PDF does the job.
Crews need sizes, counts, and slopes. A 2D plan with notes wins here. Add a plant list and a material list. Keep symbols standard. Keep labels clear.
Compliance and Permits
Many permits still expect 2D plans. They want scales, dims, and callouts. They want details for walls, steps, and rails. 2D fits this workflow.
Some offices now accept 3D views as support. They help reviewers see context. But the official plan is still 2D in many places. Ask first. Save time later.
Choosing Software as a Solo Pro
Start small. Pick one 2D tool that feels easy. Add a simple 3D tool when you need it. Avoid buying big suites you will not use. Keep your stack lean.
Focus on output. If you need bids fast, 2D matters. If you need sales, 3D matters. Let your pipeline guide your spend. Grow from there.
Choosing Software for a Small Firm
Match tools to roles. Drafters: 2D. Sales: 3D. Leads: both. Make templates for line weights, layers, and title blocks. Use standards so work is easy to share.
Track results. If 3D views raise close rates, invest more. If 2D plans cut rework, standardize them. Let data steer your budget.
Budget Planning
Make a simple plan. List goals, projects, and deadlines. Set a gear budget for a year. Set a software budget for a year. Then pick tools that fit the plan.
Do not overbuy. Tools do not make sales by themselves. Your process does. Keep tools simple. Train well. Improve every month.
Practical Tips I Use Often
- Measure twice. Build a clean base map. It saves hours later.
- Model only what helps decisions. Skip tiny items at first.
- Use sun studies for decks and patios. Noon shade matters in summer.
- Render key views only. Avoid long render times for every angle.
- Annotate as you go. Notes capture decisions. They save calls later.
Common Mistakes and How to Avoid Them
Over-modeling early is a big one. You lose time on details that will change. Start in 2D. Keep it light. Switch to 3D only when massing is set.
Ignoring grades is another. 3D can catch bad slopes at doors or paths. Even a basic terrain helps. Use it. It prevents water issues.
Mixing styles is a third. Keep plants and materials consistent. Make a palette and stick to it. The design will feel calm and clear.
A Simple Buying Checklist
- Can it do 2D plans with clean symbols and dims?
- Does it make a clear 3D view fast enough to present?
- Are plant libraries and materials good for your region?
- Does it export to the formats your partners use?
- Can your current laptop run it well?
- Do you have time to learn it before your next job?
- Will it raise sales or cut rework in 60 days?
Step-by-Step Trial Plan
Try before you buy when you can. Use a real site, not a test file. Draft the base in 2D. Time it. Then model the massing in 3D. Time it again. Compare outputs.
Show the results to a client or a friend. Ask what is clear and what is not. Measure clarity and time. That will show you which tool wins for you.
Examples That Show the Difference
Case 1: A narrow side yard. In 2D, you draw beds and pavers. It is neat and fast. In 3D, you see the fence height and a gate swing. That reveals a tight spot. You catch it before install.
Case 2: A pool with a raised wall. In 2D, the plan looks fine. In 3D, the wall blocks the view from the kitchen. You lower the wall and add a step. The client loves it. You save a change order.
Case 3: A shady lot. In 2D, plant picks look great. In 3D with sun set to winter, the patio is too dark. You swap one tree and add lights. The space feels alive.
Marketing Value of 3D
Good 3D scenes draw clicks and calls. They lift your website and social posts. They build trust fast. People can see your taste and skill before they meet you.
A clear 2D plan shows you can deliver. It speaks to detail and craft. Together, 2D and 3D form a full story. You show vision and execution. That wins work.
How to Talk About 2d vs 3d Landscape Software With Clients
I keep the message simple. I say, “I will sketch a plan in 2D to set sizes and counts. Then I will show you one or two 3D views for feel.” This sets expectations and keeps scope tight.
If they want more 3D, I price it as an add-on. This pays for the time and boosts buy-in. It also saves stress. Clear scope makes happy clients.
Training Ideas for Your Team
Make short training clips. Focus on key tasks like base maps, plant tags, and sun studies. Keep each clip under five minutes. Use them on day one for new hires.
Hold a monthly design review. Share one 2D plan and one 3D scene. Talk about what worked and what did not. This builds skill fast with real work.
How 2d vs 3d Landscape Software Impacts ROI
2D saves time on drafting and printing. It cuts errors. That reduces rework. It also helps crews hit targets. This drives profit per job.
3D raises close rates and project size. It helps you add features like lighting and shade. Those add-ons raise margins. Over a year, this can double your sales quality.
Avoiding Vendor Lock-In
Pick tools that export common files. For 2D, export PDFs, DWG, or DXF. For 3D, export OBJ or SKP. This gives you freedom to change later. It protects your work.
Keep a clean folder setup. Save source files and exports by date. Backup off-site. If a tool fails or you switch apps, you are safe.
The Role of Templates and Standards
Make a template project with layers, line weights, and text styles. Make plant symbols for your common picks. Make a page size set for prints.
In 3D, make a material set and a base scene with sun and cameras. These save hours every project. They also make your brand look consistent.
Signs You Should Upgrade
If renders take too long, you need more power or a better tool. If plans take too many clicks, you need a cleaner 2D app. If clients want more views, add 3D.
Track pain points for a month. Then pick one upgrade to fix the biggest one. Do not change too much at once. Keep production steady.
How I Talk About Budget With Clients
I explain that 2D plans are part of the base fee. I add a line item for 3D views. I show one example image and its price. This keeps choices clear.
Many say yes to one or two views. They see the value. This pays for my time to model and render. It also makes approval faster.
Why “Good Enough” 3D Often Wins
You do not need movie-level renders. Clean, bright images with clear materials are enough. Set the sun. Pick the right camera height. Keep the scene tidy.
One or two key angles beat ten random shots. Think like a photographer. Show the path people take through the space. Show the evening mood. That is what sells.
Balancing Accuracy and Emotion
2D gives accuracy. 3D gives emotion. Use both in the right order. Start with accuracy to avoid rework. Add emotion to win hearts and approvals.
This balance is the real core of 2d vs 3d landscape software. When you get it right, the process feels smooth. Projects move fast. Clients stay happy.
FAQs Of 2d vs 3d landscape software
Is 2D or 3D better for permits?
Most permit sets are 2D. They need dimensions, notes, and details. Use 2D for submittals.
Do I need a powerful computer for 3D?
For smooth work, yes. A recent CPU, mid GPU, and 16 GB RAM help a lot.
Can I start in 2D and move to 3D later?
Yes. That is a common and smart path. Draft first, then model key views.
Will 3D help me sell more jobs?
Often yes. Clear 3D views help clients decide fast and add features.
How many 3D views should I include?
Start with one or two hero views. Add more if scope or budget allows.
Final Verdict: Which Should You Buy?
Choose 2D if you need speed, clear plans, and small budgets. Choose 3D if you need buy-in, mood, and upsell power. Most teams should use both.
In the 2d vs 3d landscape software debate, start with your goal. Draft the plan in 2D, then sell the dream in 3D. That balance wins work and keeps costs down.