Add glow by duplicating layer, blur, blend with Screen, adjust threshold.
If you want a clean, cinematic glow that lifts highlights without washing your image, you’re in the right place. I’ve built glow looks for ads, music videos, and social clips. This guide shows how to add glow effects video across popular tools, when to use it, and how to avoid common mistakes. By the end, you’ll create consistent, pro-grade glow on any footage, fast.

What a Glow Effect Actually Is and When to Use It
Glow makes bright areas bloom. It mimics how lenses, sensors, and the human eye handle intense light. When used well, it adds depth, mood, and polish.
You can use glow on neon signs, specular highlights, backlit edges, candles, and UI elements. It also helps guide attention and softens harsh digital footage. If you came here to learn how to add glow effects video the right way, start by focusing on light selection, softness, and blend.
Key idea: glow is a selective blur added back with a blend mode. Control the selection. Then shape the softness. Then color it. Then blend.

Core Principles: The Four Controls That Make Glow Work
Behind every glow effect are four dials. Learn these and you can build glow in any editor.
- Threshold or key: Select what becomes glow. Usually the brightest parts.
- Blur or radius: Decide the softness and size of the bloom.
- Intensity or gain: Set how strong the glow appears.
- Blend mode and color: Mix back with Screen, Add, or Soft Light, often tinted.
These map to almost every app. If you ever wonder how to add glow effects video in a new tool, translate these four controls.
Pro tip from the field: balance glow strength with midtone contrast. Too much glow lowers perceived sharpness. I often add a tiny bit of clarity or local contrast after glow.

How to Add Glow Effects Video in Adobe Premiere Pro
Premiere Pro does not have a dedicated glow effect like After Effects, but you can build one with layers and blur. It is fast, flexible, and easy to tweak.
Steps using adjustment layers:
- Create an adjustment layer above your clip.
- Add Lumetri Color. In Curves, use Luma vs Sat or a luma key to isolate highlights.
- Duplicate the adjustment layer. On the top one, add Gaussian Blur. Start around 20–60.
- Set the top layer’s blend mode to Screen or Add. Lower opacity to taste.
- Tint the glow with Lumetri’s Color Wheels. Push toward warm or neon hues.
- Fine-tune threshold by lowering exposure on the bottom layer or adding a Track Matte approach.
Alternative quick method:
- Duplicate your video track.
- Add Gaussian Blur to the top clip. Blur until soft.
- Use Levels to crush lows and keep only bright areas.
- Set blend mode to Screen. Adjust opacity around 20–50%.
If you are searching how to add glow effects video in Premiere Pro, this workflow is reliable and renders fast. Watch for banding in 8‑bit projects. Switch to 32‑bit float for cleaner roll-off.

How to Add Glow Effects Video in Adobe After Effects
After Effects is the gold standard for glow. The built-in Glow effect is flexible. Plugins like Deep Glow add beautiful falloff and color control.
Steps with built-in Glow:
- Pre-compose your subject if needed.
- Apply Glow. Set Threshold to pick highlights. Start around 60–80%.
- Increase Radius for softness. Start around 20–80 depending on resolution.
- Set Glow Operation to Screen. Adjust Glow Intensity between 0.3–1.5.
- For richer color, duplicate the layer and tint the glow pass with Hue/Saturation.
- Add a mask to limit glow to lights or edges if needed.
Pro workflow notes:
- Use 16-bit or 32-bit color. Glow looks far better with high bit depth.
- Use Unmult or Set Matte to make selective glows on titles and logos.
- For neon signs, stack multiple glows with different radii. This builds realistic halos.
If you are learning how to add glow effects video for motion graphics, After Effects gives the cleanest results with the most control.
How to Add Glow Effects Video in DaVinci Resolve
Resolve offers two strong paths: Color page with the Glow OFX, and Fusion for node-based control. Both are excellent for narrative and commercial work.
Color page method:
- On the Color page, add a new node.
- Apply the Glow effect. Start with Shine Threshold around 0.7–0.9 to catch highlights.
- Adjust Spread and Strength. Keep Detail low for soft roll-off.
- Use Colorize to add a warm or cool bias.
- Mix the node down to taste to avoid milky blacks.
Fusion method:
- Add a Blur node and a Brightness/Contrast node to isolate highs.
- Use a Soft Glow node if available, or rebuild with Blur plus a Merge node set to Screen.
- Feed a mask to limit areas. Track it for moving lights or edges.
If you want to master how to add glow effects video inside Resolve, learn to read scopes. Keep whites under clipping and preserve midtone contrast.

How to Add Glow Effects Video on Mobile (CapCut, VN, LumaFusion)
Mobile apps can produce clean glow for social content. CapCut and VN make it simple.
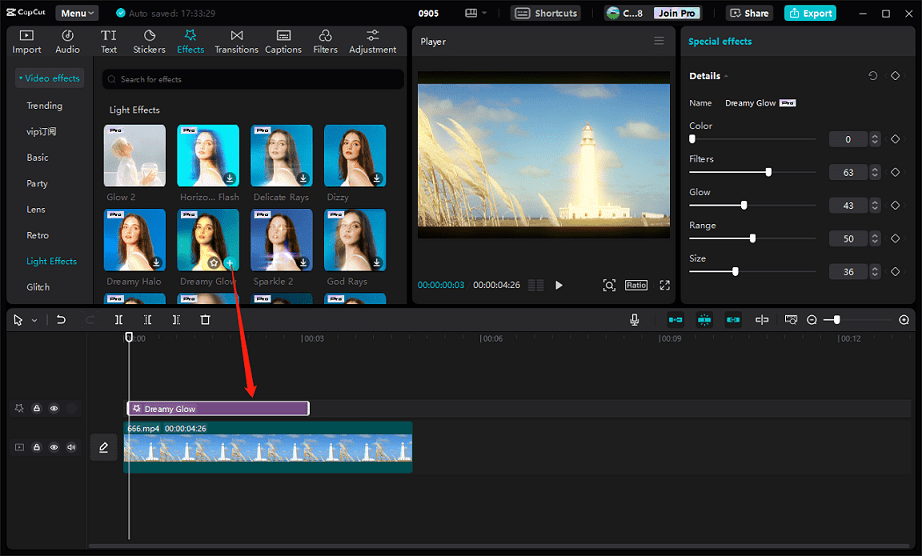
CapCut steps:
- Duplicate your clip on a higher track.
- Add Blur to the top copy. Raise blur until lights soften.
- Change blend to Screen or Lighten. Lower opacity.
- Add HSL to tint the glow to match your brand.
VN steps:
- Stack the clip. Blur the top layer.
- Use a Lighten blend. Add a curve to keep blacks clean.
- Mask the glow to neon signs, headlights, or UI elements.
If you are asking how to add glow effects video on a phone, these steps work well. Keep it subtle. Strong glow can crush detail on compressed social platforms.

Creative Styles and Use Cases for Glow
Glow is not one look. You can shape it for genre and mood.
- Dreamy cinematic: Wide radius, low intensity, warm bias. Works for romantic scenes.
- Neon cyberpunk: Strong saturation, multiple stacked glows, selective to signs and edges.
- Product shine: Tight radius on highlights, controlled threshold, clean blacks.
- UI and HUD: Masked glows on elements, tracked to motion, cool color bias.
- Music videos: Rhythmic glow synced to beats using keyframes or audio-driven effects.
When clients ask how to add glow effects video for different styles, I start with color and radius. Then I stack two or three layers to build depth.

Performance, Export, and Color Management
Glow can be heavy on the GPU. It also interacts with color space and bit depth.
- Work in 16‑bit or 32‑bit when possible. It reduces banding and clipping.
- Use proxies for heavy blur. Keep final composites in full resolution.
- Mind color management. Rec.709, HLG, and HDR treat highlights very differently.
- Export at 10‑bit for platforms that support it. It preserves smooth gradients.
If you wonder how to add glow effects video without lag, use lower preview resolution, then render at full quality. Cache effects before final export.
Common Mistakes and How to Fix Them
I have made all of these at least once. You can skip the pain.
- Milkiness: Blacks look gray. Solution: lower opacity, use Soft Light blend, or add a contrast node after glow.
- Banding: Posterized gradients. Solution: switch to 16‑bit or 32‑bit and add a tiny noise grain.
- Overexposed highlights: Clipped whites. Solution: lower intensity, bring threshold up, or roll off highlights before glow.
- Color shift: Skin turns odd. Solution: mask skin out or use a key to limit glow to highs.
- Halo edges: Glow rings around faces. Solution: soften masks and reduce radius.
Any time you study how to add glow effects video, remember that restraint wins. The best glow is often the one viewers feel but do not notice.
A Universal Workflow Checklist
Use this 10-minute checklist for any editor or plugin. It keeps results consistent.
- Set project to high bit depth.
- Isolate highlights with a threshold or key.
- Apply blur to shape the bloom.
- Choose a blend mode, typically Screen.
- Tint the glow to match palette and scene.
- Balance with contrast and saturation.
- Protect skin and text with masks.
- Test at different brightness levels.
- Preview on the target device.
- Export with sufficient bitrate and bit depth.
If you still need a clear plan for how to add glow effects video, this checklist works for Premiere Pro, After Effects, Resolve, and mobile apps.
My Field Notes: What Actually Works on Real Projects
On a night exterior car scene, I stacked three glows. One tight for chrome, one medium for headlights, one wide for street lamps. The look felt layered, not smeared.
For a neon logo bumper, I used After Effects with multiple radii and a subtle film grain. This killed banding and made the glow feel organic. That single improvement lifted the brand feel.
When clients ask how to add glow effects video on a tight deadline, I default to the duplicate-blur-screen trick in Premiere. It is fast, stable, and gets 80% of the look in minutes.
SEO-Friendly Keywords and How to Use Them Naturally
Work keywords into copy and metadata. Keep the flow natural. Avoid stuffing.
- Core: glow effect, video glow, bloom, neon glow, cinematic glow
- Tools: Premiere Pro, After Effects, DaVinci Resolve, CapCut, LumaFusion
- Use intent phrases: how to add glow effects video, best glow settings, glow plugin
Add them to titles, descriptions, H2s, and alt text. If you plan a tutorial on how to add glow effects video, include examples and timestamps. That keeps users engaged and boosts retention.
Frequently Asked Questions of how to add glow effects video
What is the difference between glow and bloom?
Glow is a general term for bright halos. Bloom often refers to physically based halos you see in games and HDR imaging. In editing, both describe soft light bleeding from highlights.
Which blend mode is best for glow?
Screen is the safest choice for most footage. Add is stronger and can clip highlights faster, so keep it subtle and watch your scopes.
How do I avoid banding in gradients?
Work in 10‑bit or higher and add a small amount of noise or grain. This dither breaks up banding without hurting detail.
Can I add glow only to specific colors?
Yes. Use HSL or RGB keys to select a color range, then apply glow to that matte. This works well for neon signs or brand colors.
What are good starting settings for a natural glow?
Set threshold high enough to catch only highlights. Use a radius between 20–60 and an intensity around 0.3–0.8. Adjust by scene brightness and resolution.
Conclusion
Glow is a simple idea with big impact. Select the bright parts, blur them with taste, and blend them back with control. Use masks, bit depth, and scopes to keep it clean and cinematic.
Try one tool today. Build the duplicate-blur-screen setup, then refine with color and masks. If this helped, subscribe for more practical guides, ask questions in the comments, and share your own glow tests.