Add realistic lights with a key, fill, rim, plus HDRI for natural bounce.
Lighting makes or breaks a render. If you want scenes that look real, you need more than a bright lamp. In this guide, I will show you how to add lighting to renders with a clear plan, small steps, and pro tips. I have lit products, rooms, and films. I’ll share what works, what fails, and how to fix it. By the end, you will know how to add lighting to renders with control and speed.
Think Like a Lighting Artist: What the Light Should Do
Before you place a light, decide what the light should say. Light can tell a story. It can guide the eye. It can set the mood. In every scene, choose what to show and what to hide.
- Define the subject. Pick one clear hero.
- Set contrast. Use shadows to shape form.
- Match a real source. Sun, window, lamp, or sky.
- Keep scale real. Big lights make soft shadows. Small lights make sharp ones.
When you think with intent, it becomes easy to decide how to add lighting to renders in any engine.

The Core Light Types You’ll Use Most
Every tool is a version of a few simple lights. Know these and you can light anything.
- Area light: Soft, natural light. Great for product and portraits.
- Spot light: Focused, controllable beam. Good for accents and stage looks.
- Point light: Emits in all directions. Handy for lamps and bulbs.
- Sun/Directional light: Parallel rays. Best for outdoor scenes.
- HDRI environment: Real sky and bounce. Fast realism for global light.
- Emissive geometry: Glowing panels or screens. Adds believable spill.
- IES profile: Real bulb beam shapes. Perfect for architectural realism.
Mix a few of these with intent, and you already know how to add lighting to renders in a clean, repeatable way.

A Step-by-Step Workflow: How to Add Lighting to Renders
Follow this simple order. It works in Blender, V-Ray, Arnold, Redshift, Octane, and Unreal.
- Set scale and units
- Use meters or centimeters.
- Real scale fixes shadow softness and bounce.
- Calibrate exposure and color
- Set the camera to an EV range that matches daylight.
- Use a color temperature in Kelvin. 6500K is neutral. 3000K is warm.
- Start with one key light
- Use an area light as the key.
- Place it off to one side and above.
- Adjust size to control shadow softness.
- Add a fill for shape, not brightness
- Use a larger, weaker light.
- Aim for gentle lift in the shadows.
- Fill is often 2 to 4 stops darker than the key.
- Use a rim or kicker
- Place behind the subject.
- Create a clean edge to separate from the background.
- Add an HDRI for global light
- Pick a simple sky first.
- Rotate it to fit the key direction.
- Lower intensity if it washes out the key.
- Tune color temperature
- Warm key with cool fill feels cinematic.
- Cool key with warm rim makes metal pop.
- Control reflections
- Shape specular with light size and angle.
- Use flags or blockers to remove bad highlights.
- Balance for realism
- Avoid full black or pure white.
- Keep a soft roll-off in bright areas.
- Final checks
- Toggle each light on and off.
- If removing a light helps, remove it. Less is more.
In my workflow, I light with the camera locked. I use a grey card to set exposure. Then I judge skin or plastic with a rim first. It keeps shapes clear. This is a reliable way for how to add lighting to renders with control.
Common mistake to avoid: adding many weak lights early. Start with one strong light. Then add only what you need.

Engine-Specific Tips That Save Time
Small engine details can change the result. Here is how to add lighting to renders with popular tools.
- Blender Cycles and Eevee
Use Filmic or AGX for tone mapping. In Cycles, increase samples and clamp indirect light to kill fireflies. - V-Ray
Use V-Ray Sun plus Sky or a Dome with an HDRI. LightMix lets you tweak each light after the render. - Arnold
Quad lights are great keys. Use exposure rather than intensity. Switch on adaptive sampling for clean noise. - Redshift and Octane
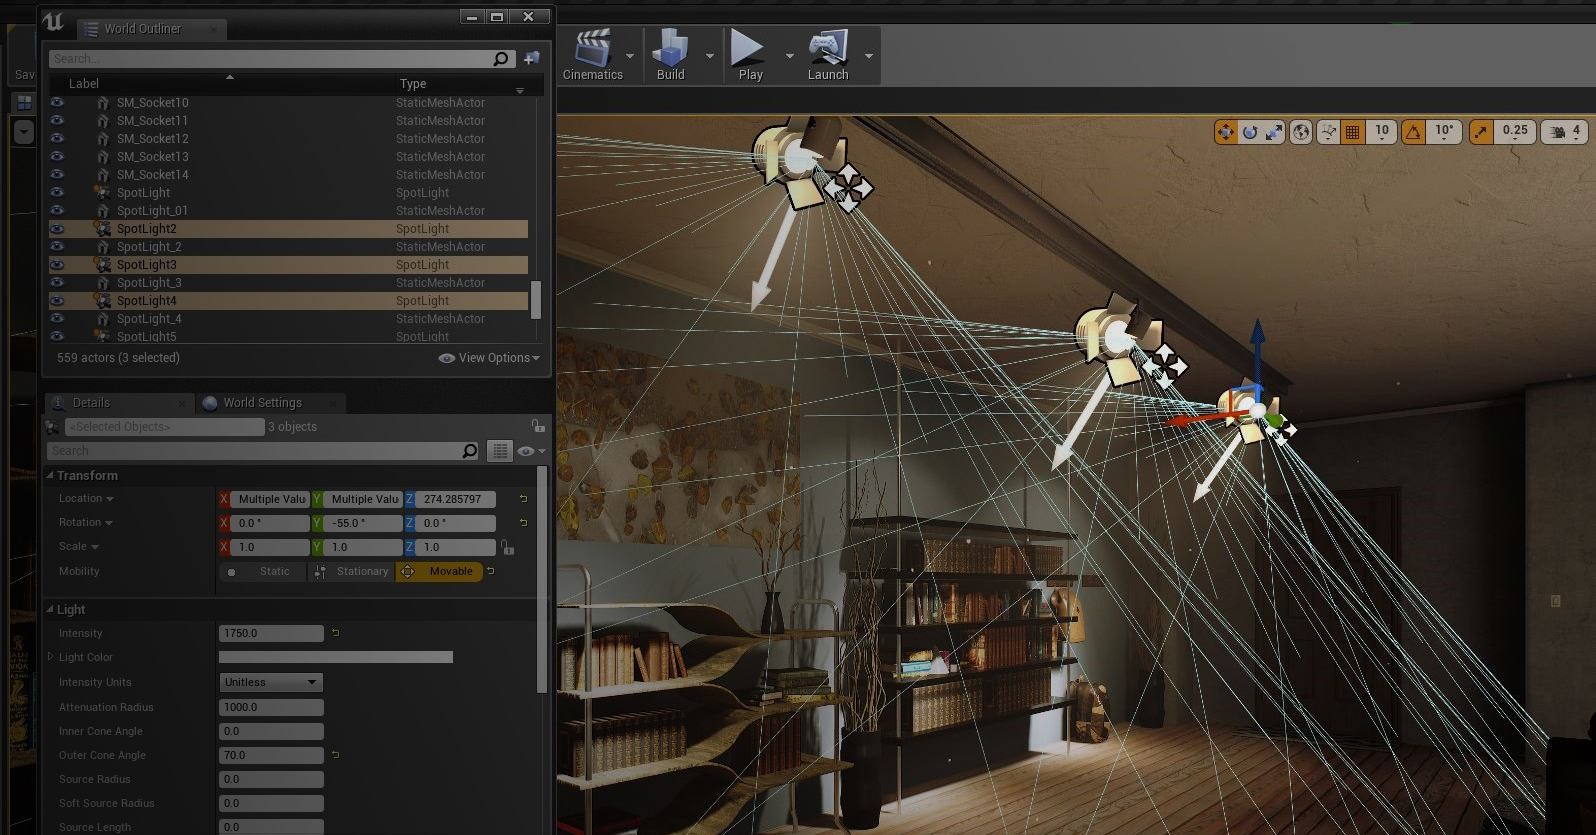
Use ACES if possible. Check specular contribution per light to shape reflections fast. - Unreal Engine
Use Lumen or Path Tracer for GI checks. Adjust post-process exposure and white balance first, then light.
With these tools, the method stays the same. The knobs differ. Learn where exposure, temperature, and tone mapping live. That is the fastest path for how to add lighting to renders in any app.

Color, Exposure, and Camera Controls
Good lighting dies without correct camera settings. Keep these simple rules.
- Work in linear color with a proper view transform like ACES or Filmic.
- Use a consistent ISO, shutter, and f-stop if your engine supports it.
- Use Kelvin for light color. 3200K is warm indoor. 5600–6500K is daylight.
- Aim histograms for gentle highlights and safe shadows.
- Control white balance with a grey card if your engine supports it.
Think of tone mapping as your print. The light is your negative. If tone mapping clips, the render will look fake. This is a key part of how to add lighting to renders that many skip.

Advanced Techniques to Level Up
Once the basics are solid, add these tools.
- Global illumination: Turn it on. It adds bounce and depth.
- Portals: Use them at windows to guide indoor light in some engines.
- IES profiles: Use real bulbs for architectural scenes.
- Light linking: Tell a light which objects to affect. Great for product work.
- Light groups or AOVs: Render separate passes per light. Tweak in comp.
- Denoising and clamping: Reduce fireflies. Keep detail with mild settings.
- Volumetrics: Add subtle fog for visible beams. Use low density.
I once pushed a product scene from flat to glossy with one trick: light linking a soft strip to only the metal edges. It looked like a studio sweep. That is how to add lighting to renders with precision.

Troubleshooting: Fast Fixes to Common Problems
If your render looks off, try these.
- Flat and dull
Increase contrast with a stronger key and weaker fill. Add a rim. - Overexposed highlights
Lower light exposure. Add a larger light for softer roll-off. Check tone mapping. - Muddy shadows
Add a gentle fill or bounce card. Raise HDRI a little. - Harsh specular
Enlarge the light. Move it closer. Change angle. - Color bleed issues
Check material albedo. Avoid pure white or pure black. - Noise and fireflies
Raise samples a bit. Clamp indirect. Use better glass settings.
These fixes cover 90% of the bad cases. Keep it simple. Then refine. This is the heart of how to add lighting to renders the right way.

Case Studies: Two Real Setups You Can Copy
Product on a table
- Use one large area key at 45 degrees.
- Add a soft fill opposite, 2–3 stops lower.
- Add a thin rim behind to pop edges.
- Use a neutral HDRI at low power for gentle bounce.
- Check reflections. Rotate the key to shape glossy hits.
Cozy interior with a window
- Use an HDRI or Sky for the main window light.
- Add a sun for a clear shadow direction.
- Place warm practicals inside with IES profiles.
- Lower HDRI a bit to let practicals shine.
- Add portals if your engine supports them for clean GI.
Both setups are fast and robust. They show how to add lighting to renders with a repeatable recipe.

Frequently Asked Questions of how to add lighting to renders
What is the fastest way to light a scene?
Start with one key light and a neutral HDRI. Add a fill and rim only if needed. Keep exposure stable.
How bright should my lights be?
Use exposure stops rather than random intensity values. Keep the key about 1–2 stops brighter than fill, with a soft rim.
Should I use HDRI or studio lights?
Use both. HDRI gives natural bounce, studio lights give shape and control. Blend them for balance.
How do I get soft shadows?
Use larger lights and move them closer. Big source equals softer shadows and smoother highlights.
Why do my renders look noisy?
You may be under-sampling or using small bright sources through glass. Raise samples, clamp indirect, and soften small emitters.
What color temperature should I choose?
Use 6500K for daylight and 3000–4000K for warm indoor. You can mix warm key with cool fill for mood.
How to add lighting to renders for metal and glass?
Shape reflections first with large lights. Use clean, broad highlights and control caustics to cut noise.
Conclusion
Great lighting is simple choices done in the right order. Pick a subject, place a key, add a soft fill, and carve a rim. Use HDRI for bounce, then tune exposure and tone. That is how to add lighting to renders that look real, fast.
Put this into practice today. Light one scene with the 1-2-3 recipe and save your presets. Want more? Explore advanced tips, subscribe for new guides, or drop a question in the comments.