Add haze, layers, light direction, and color contrast to create depth.
You want your images to feel rich, layered, and real. This guide shows how to add atmospheric depth photos with field-tested steps, simple tools, and a smart edit plan. I have spent years chasing fog, shaping haze, and studying light. You will learn how to add atmospheric depth photos in any scene, with or without natural mist. The methods are clear, repeatable, and based on visual science and practical experience.

What is atmospheric depth and why it works
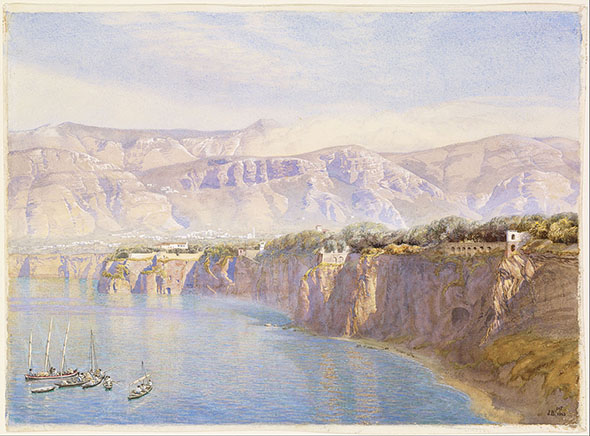
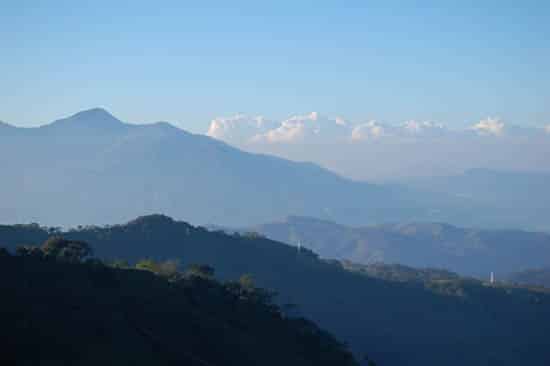
Atmospheric depth is the sense of space you feel in a photo. It happens when air scatters light. Distant things look softer, lighter, and often cooler in color. This effect is called aerial perspective.
Two types of scattering shape the look. Rayleigh scattering shifts distant tones toward blue in clear air. Mie scattering softens contrast in fog, haze, smoke, or dust. Your brain reads these cues and feels distance.
Key depth cues to use:
- Lower contrast as distance increases
- Less texture and fine detail far away
- Cooler hues and lower saturation in the distance
- Clear separation between foreground, midground, and background
If you want to master how to add atmospheric depth photos, learn these cues first. Then you can plan, shoot, and edit to amplify them.

Gear and settings that help
You can add depth with any camera. Still, some tools make it easier.
Suggested gear:
- A fast prime or a zoom with a wide aperture for subject separation
- A tripod for stable framing in low light or long exposure
- A circular polarizer to tame glare and deepen sky when needed
- A diffusion filter to bloom highlights and soften distant zones
- Safe haze options like a portable haze machine for controlled shoots
Simple settings that work:
- Use aperture to control separation. Wide for shallow depth of field. Stopped down for layered clarity.
- Keep ISO low for clean gradient tones. Noise crushes subtle haze.
- Expose to protect highlights. Detail in bright haze matters.
- Use back-button focus and single-point AF for exact subject lock.
These choices make how to add atmospheric depth photos more reliable in changing light.

Light, weather, and timing
Depth loves soft light and particles in the air. Plan around them.
Best times and conditions:
- Golden hour adds warm foregrounds and cool backgrounds
- Blue hour gives gentle tonal steps and quiet color shifts
- Fog, mist, drizzle, sea spray, and dust add natural layers
- Backlight and side light reveal haze structure
How to scout:
- Check weather apps for humidity, temperature drops, and calm wind
- Watch valleys, lakes, and forests at dawn for ground fog
- Use higher vantage points to stack layers of hills and buildings
If you study the light first, how to add atmospheric depth photos becomes simple.

Composition for natural depth
Composition guides the eye through space. Use simple, strong moves.
Practical composition tips:
- Build a clear foreground, midground, and background
- Use leading lines to pull the eye through haze
- Place subjects so bright rims or edge light separate them
- Add scale cues like people, trees, or cars
- Frame with doors, arches, or branches to anchor the near plane
- Leave breathing room. Negative space makes haze feel real
When you compose with layers, how to add atmospheric depth photos feels natural and clean.
On-set techniques to create atmosphere
You can make atmosphere when nature will not help.
Safe field methods:
- Use a portable haze machine outdoors with permission and safety checks
- In close-up work, incense sticks or a haze spray can add a thin veil
- Wet down roads or use a mist bottle for tiny highlights in backlight
- Toss fine dust or chalk sparingly for short bursts in open air
- Add diffusion filters for glow and gentle halation on highlights
Exposure and white balance:
- Backlight the haze. It lights up and separates layers
- Nudge white balance warmer on the subject, cooler on the distance
- Bracket one stop up and down for tricky scenes
Safety notes:
- Never use haze near fire alarms without approval
- Avoid enclosed spaces and protect lungs
- Follow venue rules and local laws
These tools make how to add atmospheric depth photos possible on demand.

Post-processing workflow to add depth
Editing can strengthen what the lens sees. Keep changes gentle and local.
A simple step-by-step in Lightroom or Camera Raw:
- Set white balance. Warm the subject if needed. Keep the distance a bit cooler.
- Balance exposure. Protect highlights in haze. Lift shadows with care.
- Use Dehaze in a gradient. Negative Dehaze for distance. Neutral or slight positive for the foreground.
- Add a linear gradient from the horizon up. Lower contrast, clarity, and texture as it goes back.
- Use a radial mask on the subject. Add micro-contrast and a touch of Texture.
- Add a blue-green hint in the far background with Color Mixer or Color Grading.
- Use Curves to separate midtones. Aim for soft S-curve near the subject. Flatter curve in the distance.
- Reduce saturation with distance. A small drop is enough.
- Add selective glow. The Orton look must be light and local, not global.
- In Photoshop, use luminosity masks or a depth map to target far planes. Soften and cool them slightly.
For mobile, similar steps apply in Lightroom Mobile and Snapseed. With a smart mask plan, how to add atmospheric depth photos is easy and repeatable.
Color and contrast for depth
Depth is a dance of color and tone.
What works well:
- Warm foreground versus cool background
- Higher local contrast on the subject, lower in the distance
- Slightly richer saturation near, gentler saturation far
- Lighter values in haze for aerial perspective
These rules come from how air scatters light and how our eyes judge distance. When you control these levers, how to add atmospheric depth photos becomes second nature.

Advanced depth tools and methods
Modern tools can automate separation and blur.
Options to try:
- Depth Blur in Photoshop, Lightroom, or mobile apps with subject detection
- Depth maps from phones with LiDAR or dual cameras
- AI masks for sky, subject, and background
- Focus stacking for sharp layers, then add subtle haze gradients to push distance
- 3D or video workflows in After Effects with z-depth for animated depth passes
Use these with care. The goal is realism. Overdoing blur can look fake. Done right, these tools speed up how to add atmospheric depth photos for both stills and reels.

Mistakes to avoid
A light touch keeps things real.
Common pitfalls:
- Overusing Dehaze or negative Dehaze until banding appears
- Making a uniform fog layer with no light direction
- Crushing blacks, which kills air in the scene
- Pushing blue too far, making the distance look cartoonish
- Sharpening the background like the foreground
If you avoid these traps, how to add atmospheric depth photos will look clean and professional.
Field examples and lessons learned
City rooftop at dawn:
- Plan for humid air and little wind
- Backlight skyscrapers with the rising sun
- Use a long lens to stack buildings and let haze separate them
- Edit with graduated negative Dehaze on the far skyline
Forest trail in fog:
- Shoot when warm air meets cool ground at sunrise
- Position a person with a light jacket color for contrast
- Backlight through trees for light shafts
- Cool the background and add a warm subject mask
These real cases show how to add atmospheric depth photos in both urban and nature scenes. Small moves add up. The mood feels honest.
A quick checklist: how to add atmospheric depth photos
Use this before every shoot.
- Scout light, humidity, and wind.
- Define your three layers: foreground, midground, background.
- Plan backlight or side light to reveal haze.
- Bring diffusion, polarizer, and a tripod.
- Shoot a clean base exposure. Protect highlights.
- Add gentle haze or find natural mist.
- Place a clear subject and scale cues.
- Mask edits. Reduce contrast and saturation with distance.
- Warm the subject. Cool the far planes.
- Check for banding or halos. Dial back if needed.
Follow this, and how to add atmospheric depth photos will become a habit, not a guess.
Frequently Asked Questions of how to add atmospheric depth photos
What is the fastest way to add depth if there is no fog?
Use backlight, a diffusion filter, and a light haze source. Then edit with a soft gradient that lowers contrast and saturation in the distance.
Can I create atmospheric depth on a sunny day?
Yes. Shoot backlit or side lit, include clear layers, and manage glare with a polarizer. In edit, apply local negative clarity and cooler tones to the far background.
Does focal length change the sense of depth?
Longer lenses compress layers but reveal haze steps well. Wider lenses show more foreground to background flow, which also builds depth.
How do I avoid fake-looking haze in post?
Work locally with gradients and masks, not global effects. Keep changes small and match them to the scene’s light direction.
What color grading helps depth the most?
Warm the subject and foreground. Cool and desaturate the distance slightly. Keep values separated, with lighter haze in the far planes.
Is Dehaze good or bad for depth?
It is a tool. Use negative Dehaze in the distance for air and positive Dehaze on the subject if needed. Balance is key.
Can smartphones do this well?
Yes. Use portrait mode or depth blur with restraint. Then add gentle local edits for color and contrast falloff.
Conclusion
You can build space in any scene with light, layers, and gentle edits. Start in the field with backlight, scale cues, and clean framing, then finish with local masks that respect how air works. Practice a small, repeatable workflow, and how to add atmospheric depth photos will become your style. Try one method today, share your results, and subscribe for more step-by-step guides.