Animate a lower third by designing clean shapes, adding keyframes, easing, and exporting.
If you want to master how to animate lower third for pro video, you’re in the right spot. I’ve built hundreds of lower thirds for TV, YouTube, and live streams. This guide breaks down how to animate lower third step by step in Premiere Pro, After Effects, and DaVinci Resolve. You’ll get clear methods, pro tips, and simple rules you can trust. Read on, and you’ll never settle for clunky graphics again.

What Is a Lower Third and Why It Matters
A lower third is a small graphic that shows a name, title, or info near the bottom of the frame. It adds context without stealing focus. Good lower thirds guide the eye and keep your story moving.
Editors use them in news, podcasts, webinars, and brand videos. The best ones feel natural. The animation is smooth, subtle, and fast. If you learn how to animate lower third well, your videos look premium with little extra time.
When I build graphics for clients, I think like a viewer. Can I read it fast? Does it feel on-brand? Will it look clean on a phone? These small checks save revisions later.
Plan and Design Your Lower Third
Before keyframes, plan the design. Your animation is only as good as your layout.
Follow these simple rules:
- Keep it inside title-safe. Aim for a 10% inset on all sides.
- Use a clear font. Sans serifs work well on screens.
- Limit size. Keep the height around 12–18% of the frame.
- Build hierarchy. Make the name bigger than the title.
- Ensure contrast. Follow common contrast ratios so text stays readable.
- Use brand colors. Keep it to one accent color plus neutrals.
Think through timing and purpose. Does it need a callout? Will it stack with captions? Planning now speeds up how to animate lower third later.

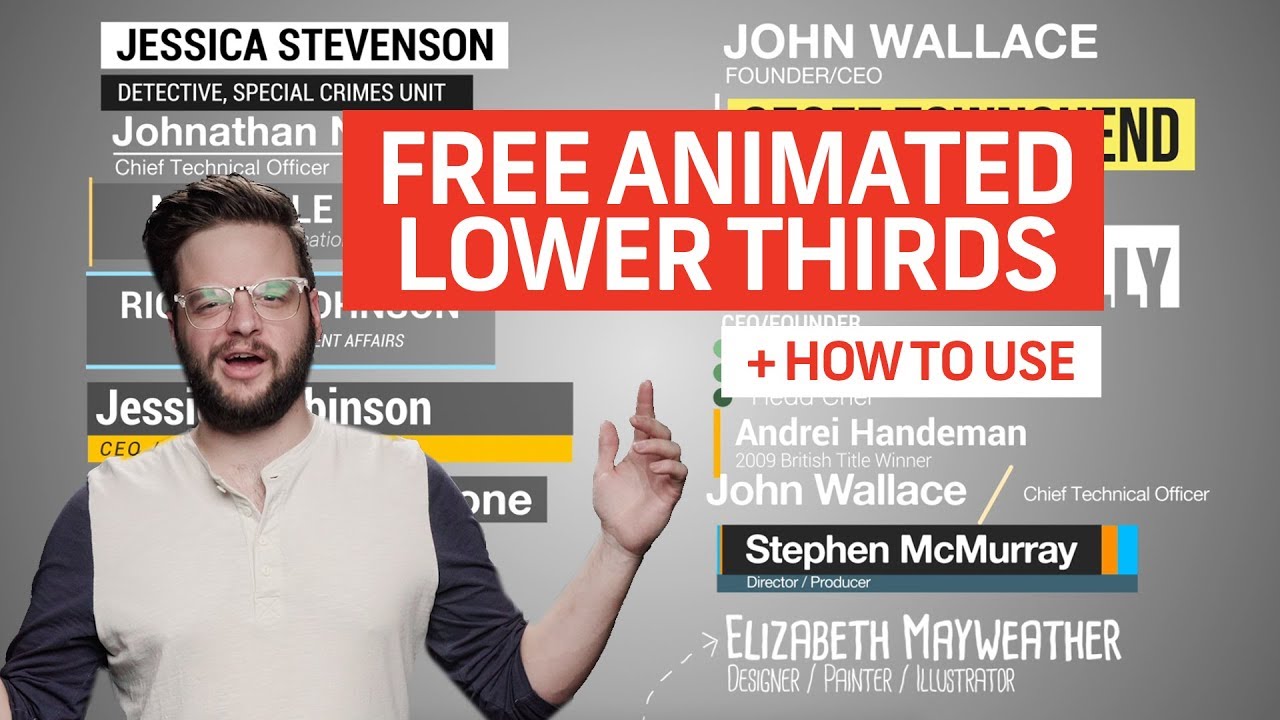
How to Animate Lower Third in Premiere Pro (Step-by-Step)
This path is fast and great for editors who live in the timeline.
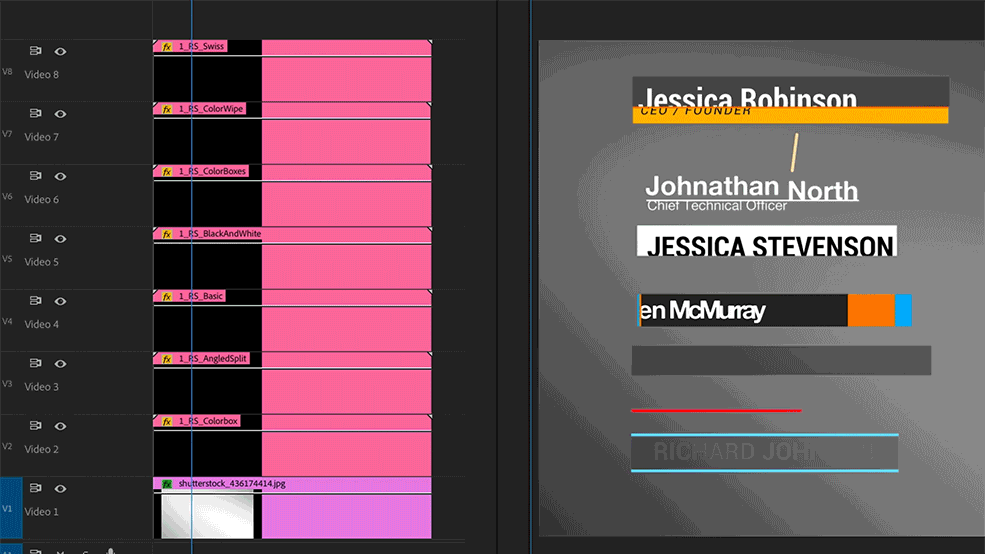
- Create the layout
- Open the Essential Graphics panel. Add a rectangle for a bar and a Text layer for the name and title.
- Align and group. Set the anchor points where motion should start.
- Animate the build-in
- Select the graphic. In Effect Controls, animate Position and Opacity.
- Use 6–12 frames for the entrance. Keep it snappy.
- Add Ease In and Ease Out. Motion should feel soft at the start and end.
- Mask for a clean reveal
- Add a Mask to the rectangle or use Track Matte Key for a wipe-on effect.
- Slide the text behind the mask for a pro reveal.
- Add secondary motion
- Nudge the title in a few frames after the name. Small offsets feel classy.
- Add a blur-in using Transform (set Use Composition’s Shutter Angle to off, then 180–360 for clean motion blur).
- Animate the build-out
- Reverse the motion. Keep the exit faster than the entrance.
- Save as a template
* Right-click the graphic and Export as Motion Graphics Template.- Now you can reuse names fast across projects.
Pro tip from the field: When I teach how to animate lower third to new editors, I tell them to test at 75% playback speed. If it still reads well, your timing is right.
How to Animate Lower Third in After Effects (Step-by-Step)
Use After Effects when you need full control and reusable templates.
- Set up the comp
- 1920×1080, 29.97 or 23.976 fps, 10 seconds long is a safe start.
- Add guides for title-safe.
- Build the design
- Create Shape Layers for bars. Add Text layers for name and subtitle.
- Parent the text to a controller Null for easy moves.
- Animate with precision
- Use Position keyframes on the bar. Add Easy Ease.
- Open the Graph Editor. Adjust speed to peak around 60–70% of the move.
- Add Trim Paths for line accents. It looks sharp and modern.
- Add overlap and polish
- Offset the subtitle by 3–5 frames after the name.
- Add a subtle scale overshoot of 102–104% with a quick settle.
- Make it flexible
- Expose text and color controls via Essential Graphics.
- Export as a MOGRT for Premiere or render with alpha as ProRes 4444.
If you want to master how to animate lower third at scale, build one master comp with controllers. Then swap text and colors in seconds. It saves hours on series work.
How to Animate Lower Third in DaVinci Resolve (Fusion)
Fusion is powerful and built into Resolve. It handles dynamic titles well.
- Create a Fusion Title
- In Edit, add a Fusion Composition. Open Fusion.
- Add Background, Rectangle Mask, and Text+ nodes. Merge them.
- Build the motion
- Keyframe the Rectangle Mask width for a wipe-on bar.
- Keyframe Text+ Position to slide in after the bar.
- Ease and finesse
- In Spline, select keyframes and set Ease. Adjust curves to avoid harsh stops.
- Add Motion Blur in the Inspector for natural movement.
- Publish controls
- Group nodes into a Macro. Expose Text, Color, and Size.
- Save as a custom Template for fast reuse.
Many editors ask how to animate lower third in Fusion without choppy motion. The answer is smart easing and short moves. Keep builds under one second.

Animation Principles That Make Lower Thirds Feel Pro
You can use the same five rules on any platform.
- Keep timing tight. 12–20 frames for in, 8–12 for out.
- Use overlapping action. Stagger parts by 3–6 frames.
- Ease every keyframe. Avoid linear motion unless you want a robotic feel.
- Add subtle overshoot. 2–4% then settle fast.
- Use motion blur. It hides micro jitters and feels cinematic.
A good test for how to animate lower third is the blink test. Blink while it animates. If the move is still clear and readable, you nailed it.
Typography, Color, and Accessibility
Text must read at a glance. Keep it simple and safe.
- Font choice. Use a modern sans serif with open shapes.
- Size. Start around 60–80 px for names at 1080p. Scale up for mobile.
- Contrast. Aim for strong color contrast, especially over bright footage.
- Backgrounds. Add a soft bar or shadow if footage is busy.
- Length. Keep lines short. Two lines max for subtitles.
When I’m teaching how to animate lower third to teams, I share a rule: if you can’t read it at half scale, it’s too fancy.
File Management, Delivery, and Export Settings
Deliver clean files that work in any edit.
- With alpha channel. Use ProRes 4444 or QuickTime Animation.
- For sequences. Use PNG sequence with premultiplied alpha.
- For templates. Export MOGRTs from After Effects or Premiere.
- For broadcast. Lock frame rate and color space with your editor.
Label versions with clear names. Keep fonts in a shared folder. This small discipline makes how to animate lower third projects scale with teams.
Common Mistakes and How to Fix Them
These pitfalls are easy to avoid with a few checks.
- Too slow. If the in takes over a second, trim it by 20–30%.
- Bad contrast. Add a dark bar or outline to protect legibility.
- Messy alignment. Use guides and even padding on all sides.
- Heavy effects. Drop glows and big blurs. Clean beats flashy.
- No exit. Always animate off. Hard cuts feel cheap.
When clients ask how to animate lower third that feels “expensive,” I fix timing first. Speed and easing beat fancy effects every time.
Workflow Tips, Templates, and Automation
Scale your lower thirds across many videos with smart setup.
- Build one master. Use controllers for text, color, and timing.
- Store presets. Save your easing and blur settings.
- Use version control. Keep v1, v2, and final with dates.
- Create style guides. Document font sizes, padding, and animation times.
- Batch render. Use watch folders to output many names at once.
If you’re training a team on how to animate lower third, give them a starter pack. Include comps, fonts, and a short how-to video. It makes results consistent.
Measuring Impact and Iterating
Check if your lower thirds help or hurt.
- Watch retention graphs. If viewers drop when graphics appear, simplify.
- Run A/B tests. Try fast vs. slow and solid vs. transparent bars.
- Get feedback. Ask non-editors if they can read it fast on a phone.
- Keep a change log. Track what you tweak and why.
This loop is how to animate lower third that truly serves the story. Design, test, refine, repeat.
Frequently Asked Questions of how to animate lower third
What is the ideal duration for a lower third animation?
Aim for 12–20 frames for the entrance and 8–12 frames for the exit. Keep the total on-screen time between 3–6 seconds.
Which software is best for beginners to animate lower thirds?
Premiere Pro with Essential Graphics is the easiest for editors. After Effects and Fusion give more control once you’re comfortable.
How do I export a lower third with transparency?
Render to ProRes 4444 or QuickTime Animation with alpha channel. You can also render a PNG sequence with alpha.
What font sizes should I use for 1080p videos?
Start around 60–80 px for the name and 40–60 px for the title. Always test on a phone and a laptop to be safe.
How can I keep my lower third readable over busy footage?
Add a soft color bar, a subtle shadow, or a blurred background strip. Increase contrast and reduce transparency if text gets lost.
Can I reuse my lower third across projects?
Yes. Build templates in After Effects or Premiere as MOGRT files. Expose text and color controls for quick edits.
How do I align the lower third for different aspect ratios?
Use title-safe guides and anchor to the lower left or lower right. Test in 16:9, 9:16, and 1:1 to make sure nothing clips.
Conclusion
You now know how to animate lower third with purpose, speed, and style. Design with clarity, plan the timing, and use easing for a smooth feel. Keep your files clean and your templates flexible.
Start small. Build one master lower third today and test it on your next video. If you found this helpful, subscribe for more motion tips, and drop your questions or wins in the comments.