Motion blur is added by enabling blur and tuning shutter and samples.
If you want your motion to feel fast, smooth, and real, you need motion blur. In this guide, I will show you how to add motion blur animation in After Effects, Blender, on the web, and in editors like Premiere Pro and Final Cut. You will learn when to use it, how it works, and how to avoid common mistakes. I have shipped motion design for apps, ads, and games, and I will share my best tips from real projects.

What is motion blur in animation?
Motion blur is the soft streak you see when something moves fast. Our eyes do it in real life because the shutter in a camera stays open while things move. Frames blend over time. That is why fast motion looks smooth.
In animation, software fakes this look by sampling movement across a frame. It blends those samples into a blur. This is the core idea behind how to add motion blur animation anywhere.
Key types you will meet:
- Per-object blur uses layer or object speed.
- Vector blur uses a velocity pass to blur more smartly.
- Frame accumulation stacks many sub-frames for a rich look.

When to use motion blur
Use blur when speed is high and edges feel sharp or stutter. It adds weight, speed, and realism. It can also hide small timing flaws.
Great use cases:
- UI micro-animations like slide-ins and carousels.
- 2D logo reveals, lower thirds, and kinetic type.
- 3D shots with camera moves and fast spins.
- Game trailers and VFX with quick cuts.
If you wonder how to add motion blur animation for UI, ads, or reels, the rule is simple: if it moves fast on screen, blur it a bit.

Core principles: shutter, samples, and exposure
To control blur, you tune shutter and sampling. Think of it like a camera.
Core terms:
- Shutter angle. How long the virtual shutter stays open per frame. 180° is natural and safe. 90° is crisp. 270° is smeary.
- Samples or steps. How many times the software samples the motion inside one frame. More samples mean smoother blur, but they cost time.
- Frame rate. Blur looks different at 24 fps vs 60 fps. Higher fps needs less blur to feel smooth.
Start points I use in real work:
- 24 fps comp with 180° shutter for film-like motion.
- 60 fps UI with 120° to 180° to avoid mush.
- Samples at 8 to 16 for previews, 16 to 32 for final.
These numbers will make how to add motion blur animation feel clear and repeatable.

How to add motion blur animation in After Effects (step-by-step)
After Effects has native motion blur that works per layer and per comp. Set it once and it just works.
Steps:
- Turn on the Motion Blur switch on the layer. It looks like three small circles.
- Turn on the master Motion Blur switch in the timeline header.
- Go to Composition Settings, Advanced tab. Set Shutter Angle to 180 and Shutter Phase to -90 for a natural look.
- Preview. If edges look noisy, raise Samples Per Frame. Keep it low while you work.
Useful effects:
- Pixel Motion Blur. Adds blur based on optical flow. Great for footage or precomps that lack native blur. Try Shutter Angle 180 and Samples 8 to 12.
- CC Force Motion Blur. Uses subframe sampling. It is slower but stable. Good for nested animations.
Pro tips from my projects:
- For kinetic type, 180° is enough. Push to 270° for speed lines.
- For UI lists, use 120° to keep text readable.
- Pre-render heavy comps. Blur after to save time.
This is the fastest way for how to add motion blur animation in After Effects with clean results.

How to add motion blur animation in Blender (Eevee and Cycles)
Blender gives strong tools for both real-time and ray-traced workflows.
Steps in Eevee:
- Render Properties > Motion Blur. Turn it on.
- Set Shutter to 0.5 for 180° style blur. Lower for crisp UI renders.
- Set Steps to 8 to 16. More steps mean smoother blur at a higher cost.
- For fast spins, add Rolling Shutter to fix skew if you want a camera-like effect.
Steps in Cycles:
- Render Properties > Motion Blur. Enable it.
- Set Position to Center on Frame for a balanced look.
- Set Shutter to 0.5. Test 0.25 to 0.7 based on speed.
- Enable Camera and Object blur. Use Deformation blur for bending or cloth.
Compositor tip:
- Use Vector pass and Vector Blur for fine control. This helps when you need how to add motion blur animation with custom passes.

How to add motion blur animation on the web (CSS, SVG, Canvas, WebGL)
The web has no true native motion blur. But you can fake it well.
Simple CSS trick:
- During a fast transform, apply filter: blur(2px) and fade it out near the end. This creates the feel of blur. Use it for sliders and cards.
SVG filter for directional blur:
- Use an SVG with feGaussianBlur and blur only along motion direction. Swap x and y blur values based on movement.
Canvas trail method:
- Draw each frame with a bit of alpha over the last frame. Old frames fade out. This creates a smooth trail that looks like blur.
WebGL or Three.js:
- Use a motion blur post-process pass. It uses velocity buffers. It looks real and runs fast on GPU.
If your goal is how to add motion blur animation for a site, keep it light. Use small blur values and only during fast movement.

How to add motion blur animation in Premiere Pro and Final Cut Pro
Premiere Pro:
- Add Transform effect to a clip.
- Uncheck Use Composition Shutter Angle.
- Set Shutter Angle to 180 to 360. Animate Position or Scale inside Transform. Do not use the clip’s native Motion controls if you want blur.
- For footage, try Optical Flow + Pixel Motion Blur for smoother transitions.
Final Cut Pro:
- Add Directional Blur from Effects for a quick look. Animate it with keyframes.
- For best control, send to Motion. Use the Motion Blur setting in the project. Set Samples to 8 to 16.
Use these steps when you ask how to add motion blur animation in an editor, not a compositor.

Performance and optimization
Blur can be heavy. Plan for it.
What to do:
- Preview with lower samples. Raise them for the final.
- Precomp or pre-render heavy layers. Add Pixel Motion Blur after.
- Limit blur on small UI text to keep it readable.
- On the web, blur only while speed is high and then turn it off.
I test shutter and samples in short test comps first. This makes how to add motion blur animation faster and cheaper to render.
Creative techniques and best practices
You can push blur beyond the default.
Ideas to try:
- Animate speed graphs. Ease into fast motion so blur grows with speed.
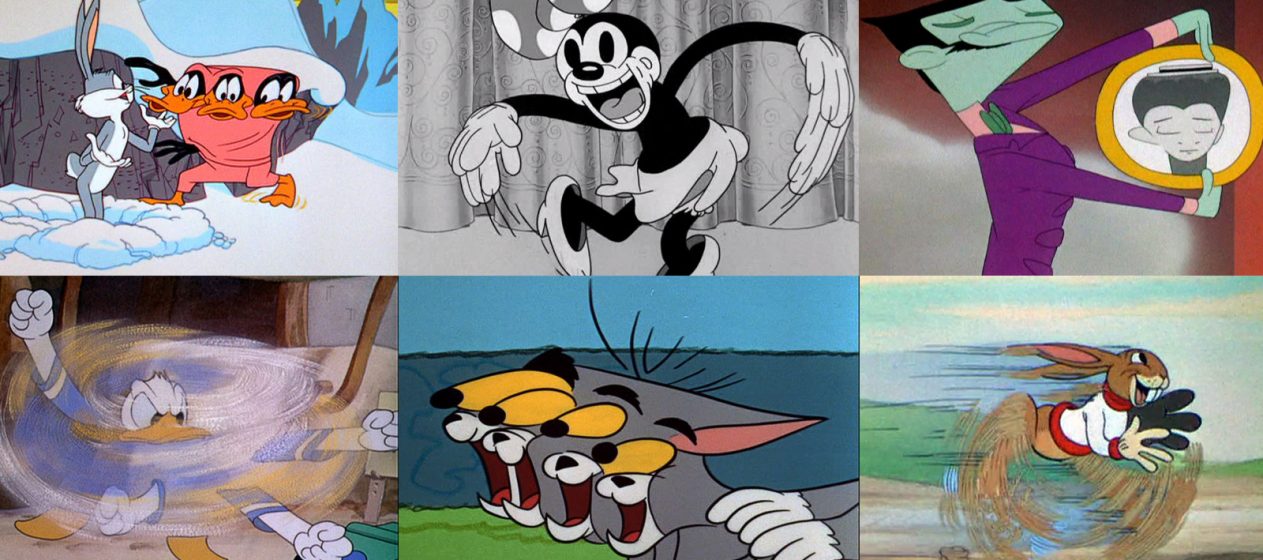
- Use smear frames. Add stretched frames for cartoony speed in 2D.
- Mix blur types. Radial blur for spins. Directional blur for slides.
- Block the blur with masks. Keep faces or logos sharp for clarity.
From client work, the big win is control. Make motion strong, but keep key details clear. This is the heart of how to add motion blur animation that feels pro.
Troubleshooting and common mistakes
Common issues:
- Ghosting. The shutter is too high or blending is wrong. Lower the shutter angle or samples.
- Stutter at 60 fps. Reduce blur or change the easing curve. Too much blur can look muddy.
- Artifacts with Pixel Motion. Fast edges can tear. Swap to CC Force Motion Blur or native blur.
- Depth mismatch in 3D. Use vector passes and holdout mattes to avoid bleeding.
When in doubt, test short ranges. This is the safest way to refine how to add motion blur animation without wasting time.
Workflow and export tips
Keep your motion smooth after export.
Best practices:
- Lock frame rate early. 24 fps needs more blur. 60 fps needs less.
- Keep bit depth at 16-bit when possible to avoid banding in blur.
- Use higher bitrate for gradients. Blur can show banding in low bitrate h.264.
- Review on phone and desktop. Small screens can crush blur.
Follow these steps and you will know how to add motion blur animation and ship it clean across platforms.
Frequently Asked Questions of how to add motion blur animation
What shutter angle should I use?
Start at 180°. It matches a natural camera look. Go lower for crisp UI, higher for extreme speed.
Does motion blur hide bad animation?
It can smooth small gaps, but it will not fix bad timing. Always polish curves first.
Is Pixel Motion Blur better than native blur?
Pixel Motion can blur footage and precomps, but it may artifact. Native blur is cleaner on vector or layer animation.
How do I keep text readable with blur?
Use a lower shutter angle and shorter move time. Fade blur out near the end of the motion.
Will motion blur slow my renders?
Yes, more samples and higher shutter cost time. Preview with low settings and raise them only for the final.
Can I add motion blur to a clip I already exported?
Yes. Use Pixel Motion Blur or directional blur in your editor or compositor. Results vary by motion type.
What is the best frame rate for blur?
24 fps looks great with 180°. For 60 fps, use lighter blur so it does not look mushy.
Conclusion
Motion blur adds life, speed, and polish to your work. Start with a 180° shutter, tune samples, and match blur to speed. Use native tools first, and bring in Pixel or Vector blur when needed.
Pick one tool today and test a short shot. Try three shutter angles and pick the best. If this guide helped, subscribe for more deep dives, ask a question, or share your own blur tests in the comments.